Have you ever looked for why Undervolting and underclocking the GPU is the best thing you can do? You are in the right place because we have an answer to your question, go through the article, and find the answer.
Before knowing the importance of underclocking and Undervolting your GPU, you need to understand that what underclocking and Undervolting are?
What is Undervolting?
As overvolting increases the power consumption in a CPU. Undervolting is the opposite of overvolting; it can decrease the power consumption of your CPU.
Basically to decrease the voltage of computer processors and components dynamically on the run time is called Undervolting. In this process, the dynamic voltage scaling conserves electrical voltage to reduce energy consumption and also to minimize the heat production of computing components.
Undervolting implemented in devices that have limited electrical supply and are powered by a battery, such as laptops and mobile devices.
Typically, Undervolting can manage by using any software-based power management utilities. But sometimes in most of the operating system, such utilities are already available by default.
Benefits of Undervolting the GPU
I know the first question which clicks in your mind after reading the definition Undervolting must be that does Undervolting GPU reduce performance? No worries remember one thing which is that Undervolting your GPU doesn’t affect computer performance. It understood that Undervolting GPU wouldn’t cut your computer performance.
As we all know, thermal throttling is dangerous for your PC; even Undervolting will help you to avoid thermal throttling. Undervolting your GPU also allows your system not heating up as much, which means the fans will not have to work as hard. It will keep maintaining the temperature of your system.
And the essential thing Undervolting doesn’t remarkably affect the performance of PC, even during high-intensity activities like intensive gaming or multitasking.
Now the next question is, does Undervolting increase battery life?
Undervolting GPU is pretty much beneficial for the devices running on batteries, especially for laptops. In my knowledge, Undervolting can result as much as a 20% increase in battery life, which means about an additional 20 minutes of battery life for a laptop that typically lasts 3 hours and it’s another perk of Undervolting GPU.
Let’s talk about, is Undervolting good for gaming?
For an excellent gaming experience, the essential thing which you have to do is to keep your system fresh. That will help you to play intensive games smoothly without any interruption.
As we know, Undervolting means to maintain the voltages provided to your PC to reduce the temperature and heat produced by computer components.
Now you can understand that Undervolting contributes to improving your gaming experience. Also, underclocking your GPU results in decreasing the FPS.
I hope you have also found the answer to your question, does Undervolting increase FPS?
How to Undervolt your GPU
There are lots of ways to Undervolt GPU. I’ll show you two different ways to Undervolt your GPU. Go for your favorite one.
But before starting one thing keep in your head that Undervolting your GPU beyond the specifications of manufacture may lead your system damage.
Use these methods on your own risk because in case of any issue found we won’t be responsible for any damage. Moreover, the first method which I’m going to tell you I specially design for the Intel system running windows.
1: By using Intel’s Extreme Tuning Utility (XTU)
Firstly you have to download and install Intel’s Extreme Tuning Utility (XTU) from Intel’s website.
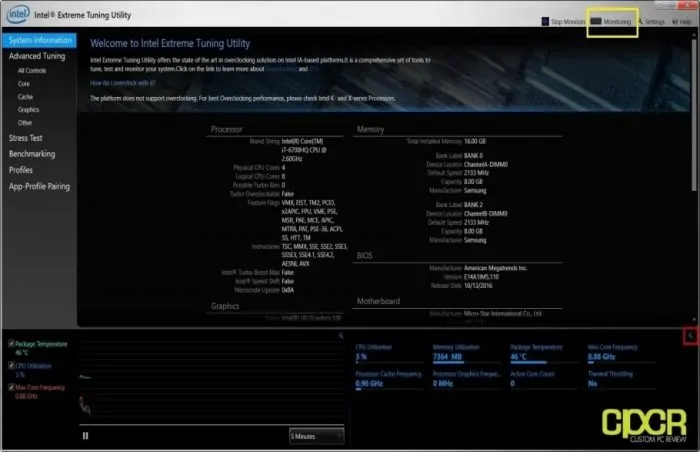
Step 01: Open the software, then you’ll be greeted with a splash screen. The very first thing that you have to do is to enable the core voltage monitoring. To allow the core to voltage monitoring to go to the top right corner “monitoring’’ section, to go to the system configuration.

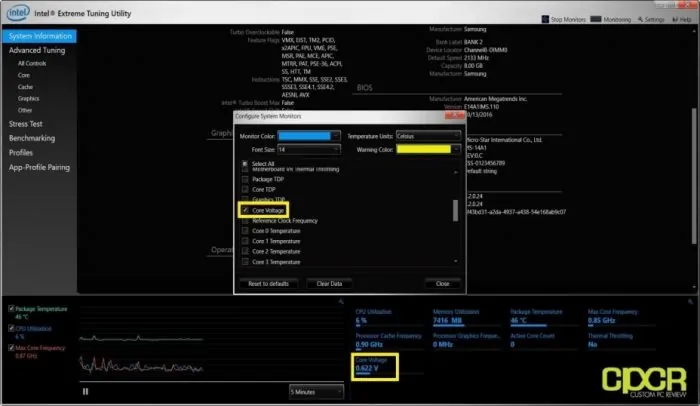
Step 02: Scroll down to ‘’core voltage’’ and tick the box to enable core voltage monitoring. A new core voltage monitor will appear showing system voltage in the system monitoring section. Now close the system monitor configuration window.

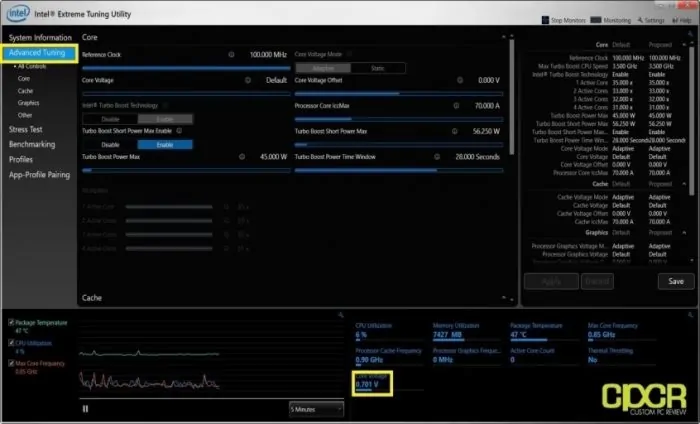
Step 03: Now from the left menu go to the ‘’advance tuning’’ option. Now take a screenshot from the snipping tool or note down the default core voltage.

Step 04: Drag the mouse over core voltage offset and decrease the voltages > then hit click on apply. In my opinion reduce voltage in increments of 0.020v (-0.020v) but continue lowering voltage by 0.005v (-0.005v) until the system becomes unstable or crashes.
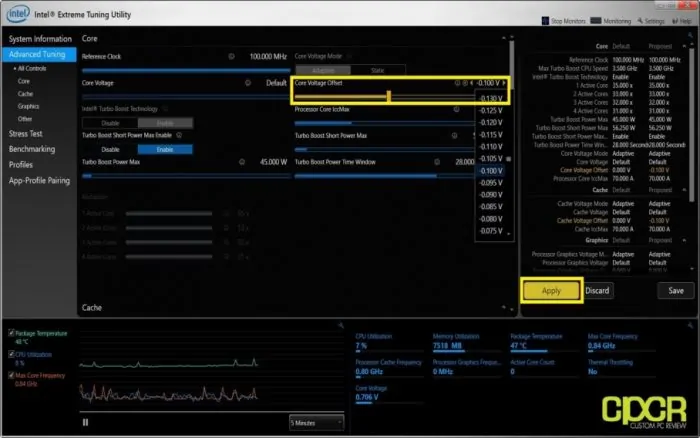

I recommend ‘’running’’ to ensure there aren’t any issues.
If your system is still stable after making changes in voltage, it means that you have successfully Undervolt the GPU.
2: By using MSI afterburner
Here is another method that you can follow to Undervolt your GPU. Download and install the ‘’MSI afterburner.’’
Step 01: Once you have completed the installation, open up the MSI afterburner software.
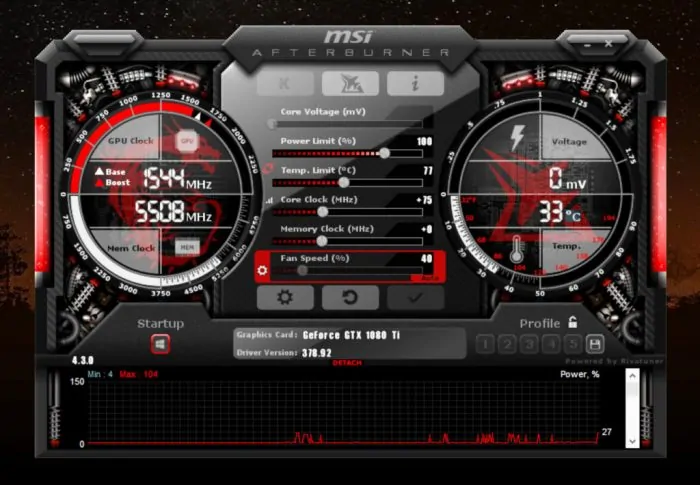

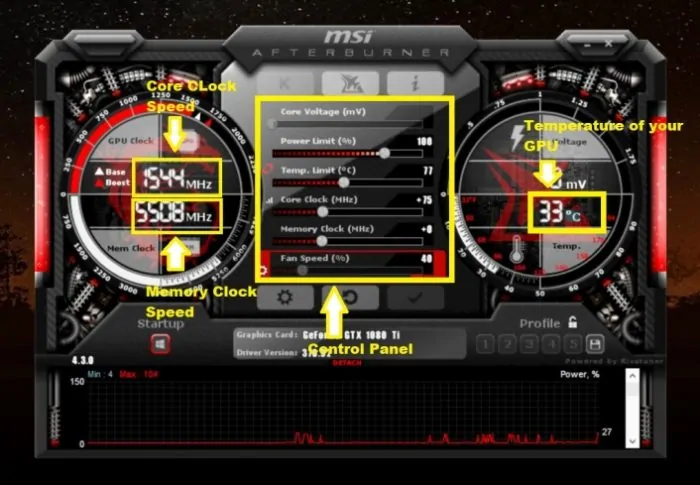
Step 02: Let’s have a look and know the function of the software through the picture which I have provided you below.
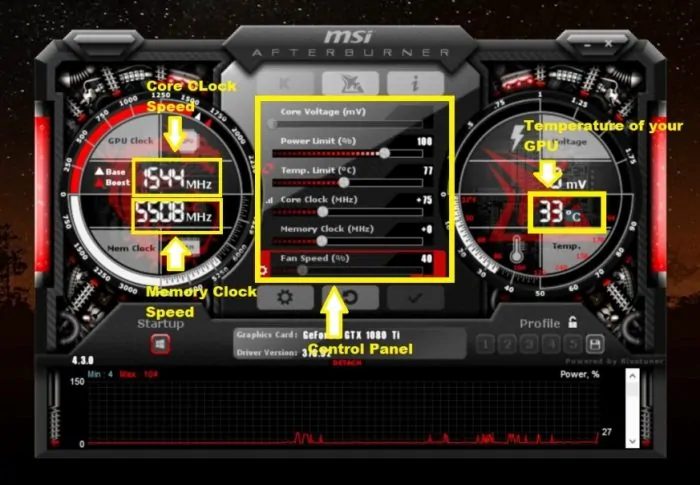

Step 03: Before making any adjustments, make sure that your graphics cards are detected.
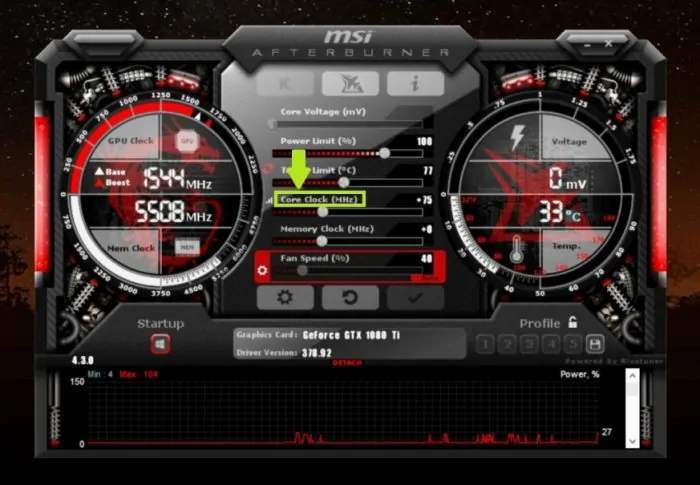
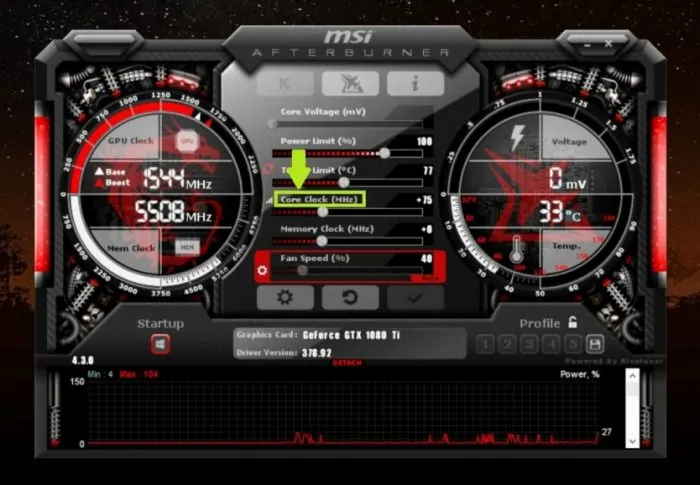
Step 04: Lower the ‘’Core Clock (MHz)’’ meter which located at the center according to your preferred adjustment settings

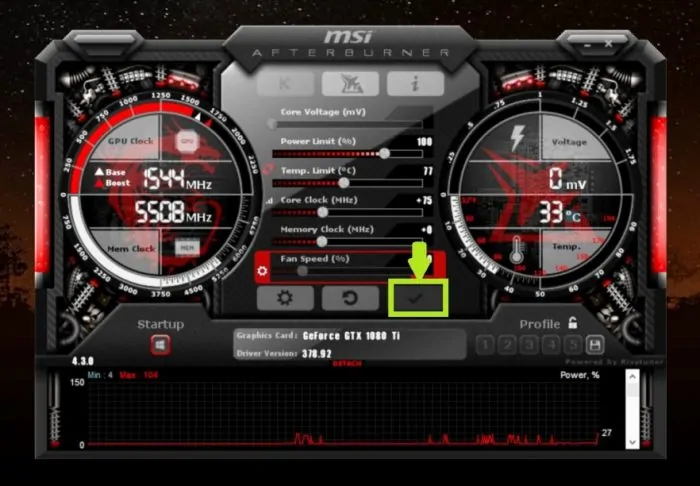
Step 05: Now click the ‘’Tick (ü)’’ button

Step 06: Save the adjustment which you have made by clicking the profile slot number.
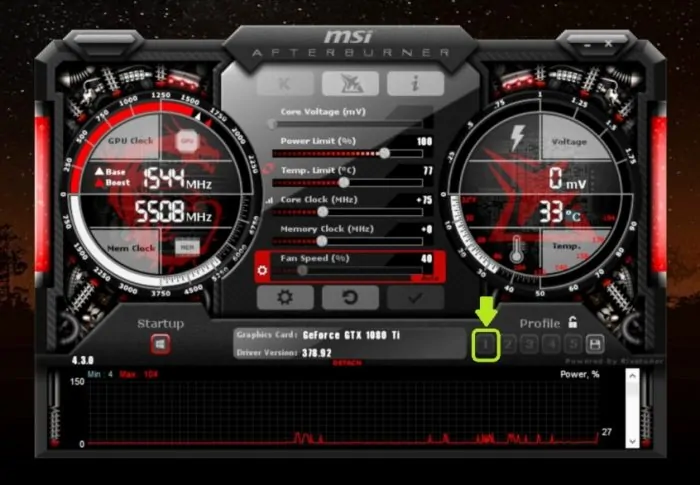

I hope that you have got the point, but if you’re still not able to understand the step. It’s ok to go through the link which I have provided you and watch the video to understand it properly.
Undervolt the CPU to reduce the amount of power delivered to the CPU whereby increasing the decreasing heat, higher the battery life, and lowering the amount of time the fans kick in.
What is overclocking?
Overclocking refers to the ability of a PC to increase the clock speed of a component above stock. PC components like Central Processing Units (CPUs) and GPUs operate at a clock speed after overclocking.
Intentionally, Clock speed is the number of cycles that it can execute in a second. The higher the clock cycle, the higher the number of instructions the GPU or CPU can perform in a second.
Overclocking a GPU increases the performance of the system by increasing the speed at which the graphical processor works.
Do most people ask what does overclocking reduce CPU lifespan?
As far as the concern of overclocking, by definition overclocking can reduce the lifespan of your CPU. It is much easier to justify that it’s a more extreme application. I hope that now you have found that why Intel has strictly restricted “no overclocking” policy when it comes to maintaining the product warranty.
Most people think that overclocking is safe as long far as they don’t increase their processor core voltage, but it’s not true. By overclocking the GPU, frequency increases drive higher load temperature, which results in reducing useful life.
How to overclock the GPU?
Let’s start!
Step 01: Download and install the MSI afterburner software > then open up the software
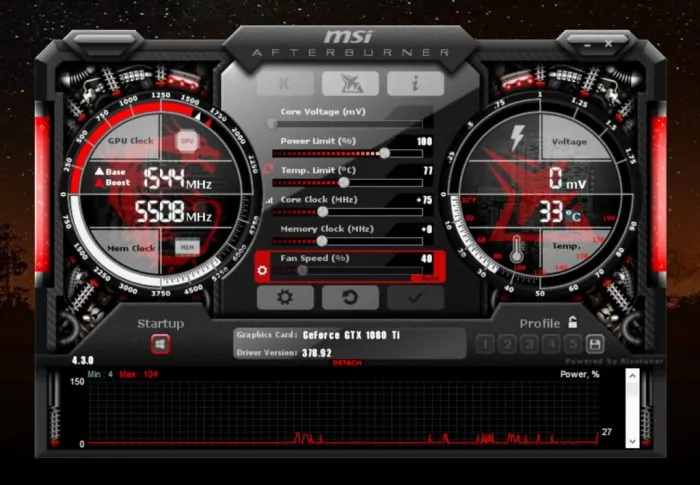

Step 02: Now, you need to understand the functions of this software. Let’s see the picture

Step 03: Now you have to install and download another software which is ‘’UNiGiNE Heaven’’. The need to download this software is to test the stress. Eventually, it’s stress testing software.
Step 04: Open up the ‘’UNiGiNE Heaven’’ software > then hit click on the ‘’run’’ button.


Step 05: Go to the ‘’benchmark’’ button located at the top left corner of the window which will start the benchmarking process.


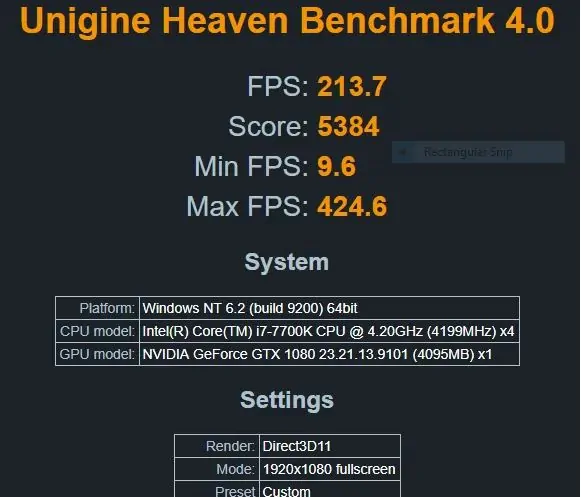
Now it results in running a series of tests. The test will let you know about the temperature, frames, graphics clock, and memory clock. Keep the test running, and it will take hardly 10 minutes to complete but remember one thing. During the trial, keep an eye on stats located at the top of the screen.
During the test, your GPU will reach a specific temperature and remain the same throughout the experiment. This will lead you to get an idea about how much room you have for overclocking.
The test will also provide you a score and average FPS stats. I recommend you to save that information to be used later if needed.

Step 06: Now go to the MSI afterburner and click on the ‘’setting’’ button.
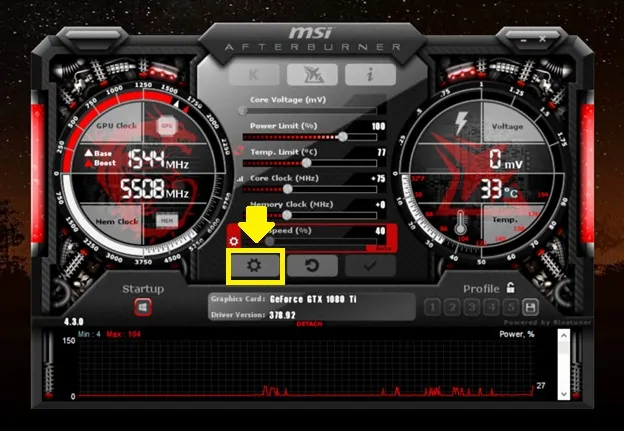

You have to restart your PC after some seconds, make sure that you have bookmarked this page to come again on it.
Step 07: Now go to the properties of MSI afterburner and then click on the ‘’general’’ button check Unlock voltage control, Unlock voltage monitoring, and Force constant voltage.
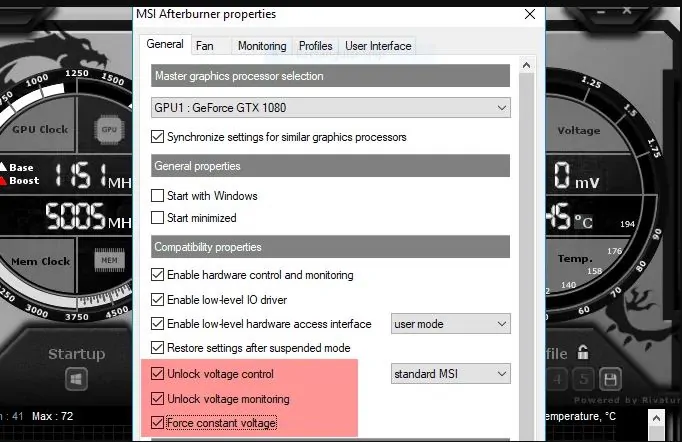

Step 08: Now click on “Apply” then hit the “OK” button.
Once you have done the above steps, you’ll be asked to restart your PC. After restarting your PC, open up MSI Afterburner and Unigine Heaven again.
Step 09: Go to the MSI Afterburner and start dragging the core clock slider towards the right side and set it on +23 > then click the ‘’Tick (ü) ’’ button.
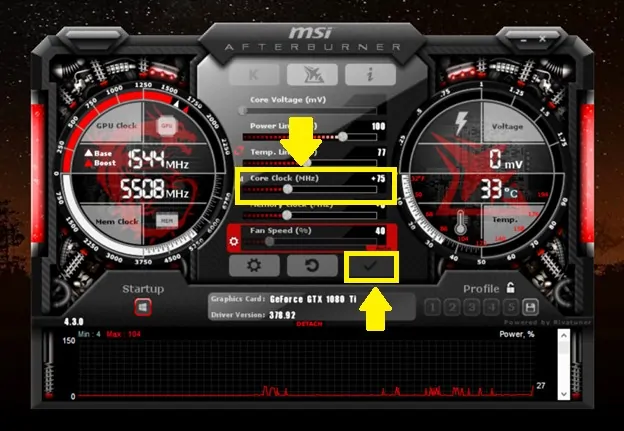

Step 10: Go to the Unigine Heaven, and hit the benchmark button to start the test, wait for finishing 26 scenes. You notice that the score improves slightly as compared to the last time.
Now you have to overclock your graphics card to its full potential.
Step 11: Again go to the MSI afterburner and increase the clock speed from 20 to 30
Step 12: Go to the Unigine Heaven and click the benchmark button to start the test and wait till the 26 scenes complete.
If your PC still doesn’t crash and you’re not able to notice any graphical glitches, repeat from Step# 1.
If your system would crash after completing the steps, don’t create panic. Open up the MSI afterburner and decrease the clock speed by 30
Once you’re finished with overclocking, click the ‘’Save’’ button on MSI Afterburner and then click a number to assign it to that slot to save your settings.
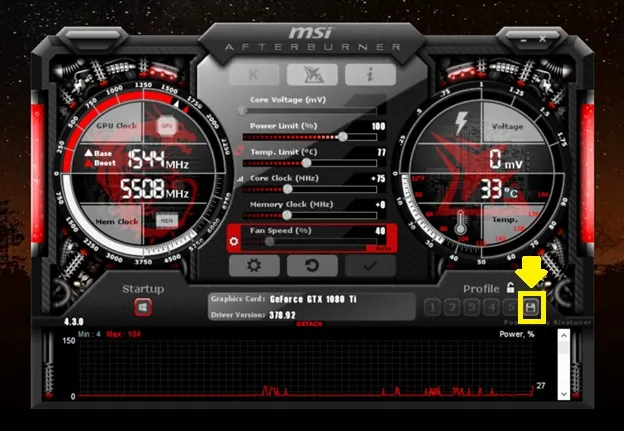

Sometime games may not work well with your overclocked settings, so if you notice graphical glitches or your game crashes. Just go to the MSI afterburner and click the reset button which will lead you to go back to default settings.
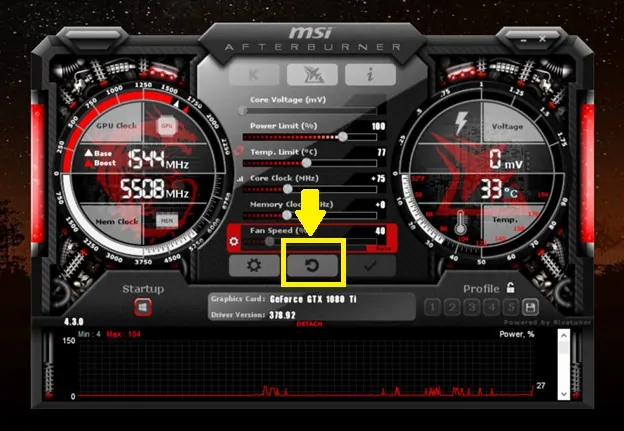

What is underclocking?
Underclocking is the opposite of overclocking. Underclocking refers to reduce the clock speed of your GPU on which it’s operating. Underclocking means run your PC over its average speed to get the best performance.
Underclocking helps in excessive heat buildup because lower performance won’t generate that much heat inside the device. Underclocking also lowers the amount of energy needed to run the system. Laptop computers often have underclocking settings, that why batteries last longer without being charged.
How to Underclock GPU AMD?
Let’s underclock Your AMD and NVIDIA GPU with MSI Afterburner. To underclock PC, you have to follow the step below.
Step 01: Download and install the MSI Afterburner > open up the software after installation.
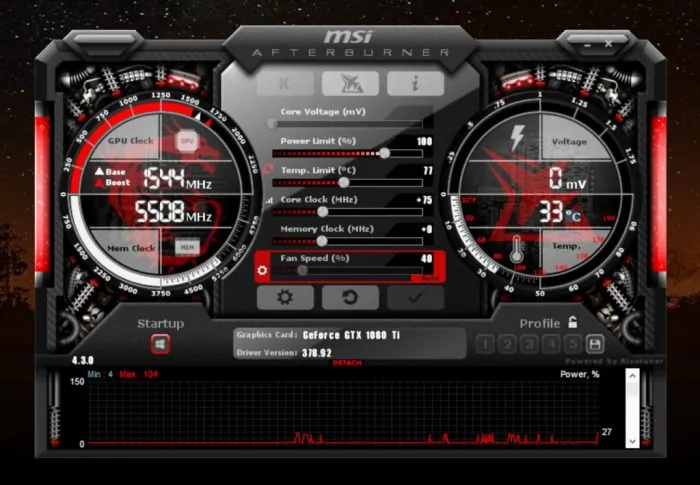

Step 02: Verify that your graphics card detected before making any adjustments.
Step 03: Now decrease the Core Clock (MHz) meter, which located at the center according to your preferred adjustment settings.

Step 04: Click the ‘’Tick (ü)’’ button.
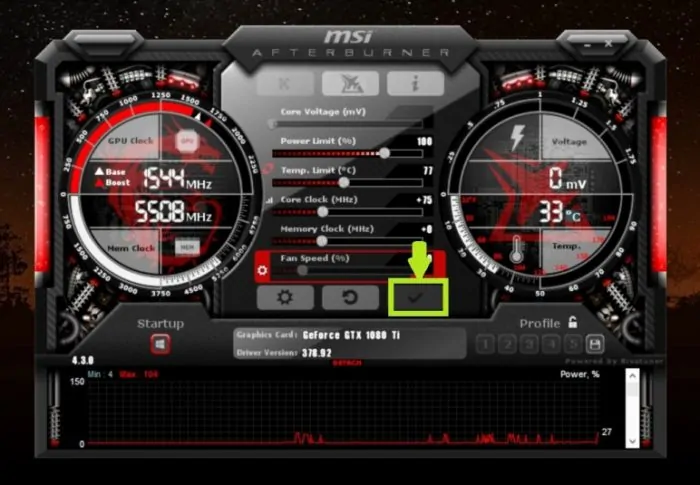

Step 05: Now it’s time to save the changes which you have made. To keep the adjustment, click on the slot number.
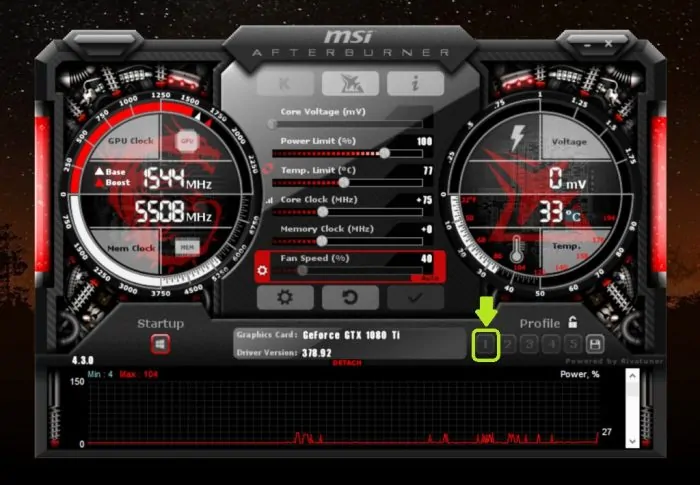

Step 06: Once you’re finished with underclocking, click the ‘’Save’’ button on MSI Afterburner.
If you have any confusion, Watch this video
Final Words
Conclusively, underclocking your GPU will lead you towards lower power consumption because the decrease in clock speed of GPU leads you to run the hardware at the minimum pace. Underclocking and Undervolting also help you to keep your system cooler, and at a lower temperature, you hear lesser noise of the fan.
Not everyone needs an overclocked, GPU. Many users use only a little bit of memory from how much memory their graphics card can deliver.
If you are still not clear about this topic, then feel free to ask by commenting in the comment box below.
